I love this vanilla powder! It makes all of my recipes taste delicious and I have peace of mind knowing there’s no added alcohol or other additives. Grateful for this company.
Been taking this product for a few months already and I absolutely love it, wanted to switch over to something more natural and no additives from big name companies and found this gem. Highly recommend! Love this blend
I have tried many different whey protein powders over the years and none compare to this one offered by Wild Foods. I have been a customer now for over five years.
You may find cheaper whey powders, but that is because they are mass produced and are not as natural as Wild Foods' products. The closest one I have found to this is a GNC product which is comparably priced, but still not produced by grass fed cattle.
Considering, taste, price, and production methods no other product I have found can compare to Wild Foods Whey Powder.
Love this powder, ordered several times and planning to keep using this product. It's helps with condition of my nails and joins the most. Thank you so much!!
This is the best matcha I have found, I love the taste and it’s not bitter. I look forward to my matcha latte everyday and I was so happy to find it sold by the case FINALLY so I don’t run out!!!
Got the elderberry version instead of the normal version. Not a huge difference in my eyes and still throwing it in my protein shakes! Great stuff as always from Wild :)
The super greens powder mix really helps my gut health. I mix it up with 8 ounces and take my daily vitamins with it and the taste is very pleasant. So glad I found this product!
I was skeptical if ordering the liquid version of the fish oil but it's been a pleasant surprise! The taste is mild and it goes down easy. Would order again.
I take this cause I'm an athlete and a singer/dancer and love feeling confident in my lung capacity so I take this stuff. I also had covid 2.5 years ago and I'm still working on keeping my lungs healthy.
Most people think hot chocoate or hot cocoa is supposed to be sweet. But that's not how the ancient Mayans used to drink it, and they invented the drink!
It was a savory, even bitter, beverage made from grinding up cocoa beans into a fine paste and then steeping in hot water.
Fortunately for us, we can add a dash of sweetener!
This recipe is nearly identical to our Wild Butter Brew Coffee recipe, but by using milk or water instead of coffee as the base (butter being optional), you end up with the drink recipe below.
A thing we often encourage here at Wild Foods is experimenting in the kitchen.
That means to look at a recipe as a "template" and not a "recipe."
We want you to look at a recipe, like the one below, and follow it as a rough guideline, making tweaks here and there and tasting and refining your final concoction.
Because you are a unique little snowflake (and I mean that with all sincerity), you have a different palate and preference for the foods you eat and drink.
You might like your drinks sweeter or not sweet at all. You might prefer iced over hot drinks (like I do). And so on.
The recipe below is our Wild Recipe Template take on traditional hot Cocoa/Drinking Chocolate
Step 1: Bring 10 Ounces Water To Near Boil In Small Pot
1 TBSP of Kerrygold Butter (or 2 tbsp, this stuff is the ticket)
Optional: 1 dash of Wild Vanilla Powder (Available here)
Optional: 1/2 TSP Organic cinnamon
Optional: 1/2-1 TSP Xylitol from maple (not corn)
Optional: Add a scoop of Wild Whey after step 3, after coffee has cooled, then shake lightly to combine. Avoid blending or adding Wild Whey to hot liquids as this can damage the beneficial immunoglobulins!
Brew coffee with preferred method (Brewing methods here)
Place hot coffee in a blender with 1-2 tbsp MCT oil, 1-2 tbsp pastured butter, 1-2 tsp of Wild Chocolate powder, a dash of Wild Vanilla powder and desired sweetener
Blend until frothy
If you prefer it hot, drink your beverage now. If not, proceed to next step.
Place Butter Brew in freezer to cool down for 3-5 minutes
Remove from freezer
Add ice and give it a shake
Enjoy!
Common errors making butter coffee:
Blending too aggressively. Blend/Pulse in short bursts.
Using coconut oil over MCT oil. Coconut oil leaves a coconuty aftertaste and doesn't have the same smooth consistency as MCT, which has trouble emulsifying.
Not using the best beans. Wild Coffee beans are fresh roasted, single-origin, fair trade and organic. They are ultra-premium and uber-fresh. Using quality coffee makes a HUGE difference in not only how your butter brew comes out, but also in how you'll feel after you drink it.
How To Put Butter in Your Espresso
Some tips for Butter Espresso:
Let the butter come to room temperature for a few minutes. If it's too cold, it won't completely blend and you'll end up with (delicious) chunks of butter in your espresso.
Blend for 30-60 seconds. Because there is such a small amount of liquid in espresso, it takes some time to fully blend the butter and form the emulsion.
Test the amount of butter. I've successfully used up to 2 tablespoons of butter in a double shot of espresso. However, I find that 1 TBSP is plenty. Test and find what you like.
Use unsalted pastured butter, like Kerrygold.
Optional ingredients you can add to make your own butter espresso concoctions:
One of the most common questions we get about coffee here at Wild Foods is this: How much coffee should I use?
When I first got into coffee, I looked around the Internet for an answer to this very question.
And I looked hard….
What I wanted to find was a rule-like answer, something easy to remember and follow.
Of course, that didn’t happen.
But a lot of trial and error at home did happen.
And now that I’m on the answering end of this question, even though I want to, I can’t dole out easy answers to this question.
But I can dole out guidelines… general ones… that will help you find what works for you.
Hopefully the following guidelines will save you time in figuring it out for yourself.
Why There Is No Perfect Answer
The reason most questions about coffee don’t come with simple answers is because coffee is subjective.
Subjective: based on or influenced by personal feelings, tastes, or opinions.
It’s near impossible to tell you what the perfect ratio of coffee to water is because it depends on what you like!
Most people want the answer. But alas, I can’t give that to you.
The next best thing I can give you is the formula for figuring out what the answer is… for you.
And that comes in the form of math.
This is something you should know about coffee: it’s a game of ratios.
Ratios of grounds to water and how this ratio can be further adjusted depending on the grind size, water temperature, roast level and specific bean characteristics.
We won’t get into too deep of a rabbit hole on these though because that would just confuse you more.
What I really want to do today is give you the general guideline ratios for coffee-to-water so you can test at home and find the ratio you love the best.
To start, you need to buy a gram scale. This is nonnegotiable. They are cheap and you’ll use them forever in your tea and brewing life.
How To Find The Perfect Coffee To Water Ratio To Make Your Perfect Cup
The first part of the coffee brewing ratio is the amount of coffee you are using—best measured in grams.
The second part is water, which is also best measured in grams. Fortunately for us, one gram of water is equal to one ml of water—you’ll see why that’s useful in a second.
So, first get your gram scale tared up. Next figure out how much coffee you are going to brew by choosing a ratio (see below). If you don’t know where to start, start with a 20-1 ratio (water to coffee).
Next you’ll weigh out your whole coffee beans (ideally uber-fresh Wild Coffee) to the desired weight. (I use somewhere between 15g and 20g for my morning brew.)
After measuring your whole beans, grind those beans to the appropriate grind size for your brewing method (pour over, drip, French press, etc.).
We’ll use the pour over method for our example because it’s my fav, but you can use the same ratio and steps with most brewing methods (although espresso tends to have it’s own set of rules, so make a note of that if you are pulling shots).
Once you have your freshly ground coffee ready to brew, place your brewing vessel on your gram scale and then add your fresh grounds. Now tare your scale back to zero so you can measure the exact amount of water you are using during the brewing process.
This is where the magic happens.
Make sure you use the exact amount of water needed to reach your ideal extracted weight—this is just fancy speak for the black liquid called coffee.
To figure out how much water you need, multiply the first number in your ratio by the amount of grams of coffee you are using.
Example: For a 15-1 ratio brewed using 15g of coffee, you’ll use 225g of water.
This means you’ll pass 225g of liquid through your beans and end up with about ~225g of coffee.
Make sure you use grams for your coffee grounds and milliliters/grams for water (1ml = 1g of water).
Now on to the ratios you can test to find your perfect cup. Keep in mind that the brewing method can significantly change how each ratio tastes, not to mention the roast profile and bean themselves. Again, make sure you experiment!
Finding Your Ideal Coffee To Water Brewing Ratio
Remember: The first number represents water and the second coffee.
15-1 – I’v seen a popular West coast coffee company recommend this ratio. Personally, I think it depends on the coffee bean and brewing method as this tends to be a bit on the “strong” side.
16-1 – This is what I personally use… somewhere between 16 and 17.
17-1
18-1 – This is the standard set by the Speciality Coffee Associated of America. I think it’s a bit too much water.
19-1
20-1 – This is the max I’d go on this end of the spectrum. Of course, that’s just me, so if you feel like you want to try a 25-1 or 30-1 ratio, go ahead.
Say you have 15g of coffee and you want to do a 17-1 extraction. You’ll pass hot water through your coffee until you have 17 times 15g, or 255g of extracted coffee liquid.
A few more examples so you can fully grasp the formula…
20g Coffee at a 17-1 ratio = 20g X 17 = 340g water passed through coffee grounds to produce 340g of coffee
90g Coffee at a 15-1 ratio = 90g X 15 = 1350g water passed through coffee grounds to produce 1350g of coffee
As you probably figured out by now, the less water you use, the more coffee solids you’ll have in your final cup relative to water. On the flip side, the more water you use compared to grounds, the more “diluted” your final cup of coffee will be.
You typically hear people refer to the opposite end of this spectrum as “strong” or “weak.”
The thing is, a 16-1 ratio of a light roast might seem just right to one person and too weak or too strong to another.
That’s why there’s no rule here; it’s all preference.
Experimenting and finding out what works best for you is part of the experience of enjoying coffee.
How To Brew The Perfect Cup Of Coffee Using Math
Gear Needed:
Gram scale
Grinder
Fresh Coffee Beans
Decide on ratio: 15-1, 16-1, 17-1, 18-1, 19-1, 20-1
Process:
Fill your kettle with more than enough water to reach your desired final coffee output.
Weigh your beans on a gram scale.
Grind the beans then put them in your brewing device.
Tare your brewing vessel so you can measure the exact amount of water that is going to pass through your coffee grounds. (If you are using a brewing method that makes this impossible, you’ll have to do your best to measure out your water in step 1.)
Pass your hot water through your coffee grounds until your extracted weight is equal to your chosen ratio multiplied by the weight of your coffee beans. See examples above.
Smell and taste your fresh brewed coffee before doing anything else to gauge if the ratio used makes you happy. If the ratio doesn’t make you happy, e.g. it is too “weak” or too “strong,” then you know to adjust your ratio up or down on your next brew.
But, if you are like us, you also watch your sugar and processed food intake.
And unfortunately for us both, chocolate is one of the most processed foods in the world.
Some of this processing is fine and is necessary because it makes raw cacao safe for us to consume. Of course, there are better and worse ways to process chocolate.
Beyond the cocoa in a chocolate bar, there are usually other ingredients added in to make a final chocolate product—sugar, soy lecithin, nuts, berries, seeds, fruit, spices, etc.—all of which vary in their quality and processing.
Where does the cocoa in that wrapper come from? Do you know? You should.
The fact is, the mass-produced chocolate on the market today is nearly always made from sick, mass-farmed cocoa trees and their cocoa pods.
The best cocoa grows in natural forest canopy, often at higher elevations. Cocoa is a fickle plant, similar to the coffee plant, and is not meant to be planted in a large mono-crop setup.
Furthermore, mass-produced cocoa, because the goal is usually speed and quantity, undergoes all kinds of chemical and mechanical processing methods as a means to produce the cocoa cheaper, in larger quantities and to cover up the bad flavors that come from sick, overly abused cocoa trees.
Simply put, most chocolate in a wrapper is bad for you.
(Opt for organic, fair trade, single-origin and small-batch dark chocolate bars when you do buy it in the store. There are many good brands out there.)
What if you could enjoy chocolate guilt-free?
What if you didn’t have to worry about the quality of the chocolate and whether the company added extra ingredients or used harsh processing techniques to make that chocolate?
The beautiful thing about homemade chocolate is you control exactly what goes into the final product. As long as you are buying premium (Wild) ingredients that are grown and processed the right way and limiting the amount of sweetener (and what kind) you use, you can indulge your chocolate craving guilt-free.
Let’s get to the recipes…
Below are three recipes for making homemade chocolate. You can adjust sweetener to your preferred taste.
Something to remember about homemade chocolate is it takes some practice to get just right. So be patient, taste as you go, and adjust as necessary.
Now get in the kitchen and embrace your inner chocolatier!
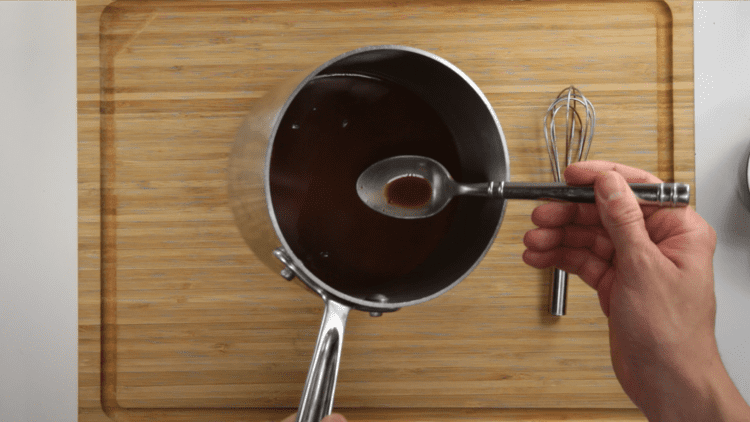
In saucepan heat Wild MCT, Cocoa Butter, Wild Chocolate and Sweetener on low heat and whisk until a smooth consistency. Taste mixture and adjust ingredients to your desired tastes.
Pour mixture onto large parchment lined baking sheet or dish. Aim for a thin layer.
Place in freezer for 1-2 hours.
Enjoy!
Remove and keep frozen or refrigerated.
*Optional ingredients you can experiment with: Nuts/Seeds, Sea Salt, Dried Fruit, Coconut flakes, Spices, Lemon/Orange zest, Cinnamon.
Homemade Nut Butter Cups
Ingredients:
Homemade Chocolate Bar Recipe or 1-1/2 cup Organic Semisweet Chocolate Chips
For Homemade Chocolate Recipe do this: In saucepan heat Wild MCT, Cocoa Butter, Wild Chocolate and Sweetener on low heat and whisk until a smooth consistency. Taste mixture and adjust ingredients to your desired tastes. b) For Chocolate Chip Method do this: Melt chocolate chips and milk using double boiler method and keep stirring into fully melted.
Pour chocolate mixture into molds to fill 1/3 full.
Place in freezer for 10 minutes.
Remove and spoon in 1/3 nut butter (you can whisk some nut butter with a bit of water or coconut milk to make it easier to work with + you can experiment with adding other flavors using this method).
The cups should now be 2/3 full. Pour the chocolate mixture over the top until full.
Apparently nature decided to make coconut good at everything, literally everything.
You can eat it, and use it for a host of health and beauty applications.
Coconut also produces MCT oil, a workhorse in the Wild pantry with a multitude of uses.
25 Uses For Coconut Oil
1. Moisturizer – Coconut oil is great for your skin. Experiment with how much and where to apply. It can be pretty greasy so make sure you use a little to start. It improves nearly anything skin related.
2. Stretch marks – It helps prevent and minimize stretch marks… apparently. Worth a shot still.
3. In your coffee – I use MCT oil for this which is a purified form of coconut oil but if you don’t mind a strong coconut taste, coconut oil can work as well.
4. Smoothies – One of the issues with smoothies is the lack of fat and an overload of carbs and protein. Enter coconut oil (and coconut milk) to solve this problem.
5. Cooking oil – Great for low-medium heat cooking. Watch for the oil smoking, which means the heat is too high.
6. Body scrub – Combine coconut and sugar or salt for a DIY body scrub.
7. Great for shaving – Try it as a substitute for shaving cream.
8. Bath soak – Melt some in the microwave and add to your bath. Then soak (you might have to use soap after to get the ‘greasy’ off though).
9. Massage oil – Try it.
10. Mouth wash – swish in your mouth for a few minutes. Acts as a natural floss and mouth rinse (I do this daily). This is known as “oil pulling.”
11. As a supplement – Take a TBSP with each meal to get all those nutrient-packed fats into your belly.
12. Season a cast-iron pan – Rub a bit on the pan after use.
13. Conditioner – Don’t use too much! It can be tough to get out.
14. In place of antibiotics like Neosporin – Rub a bit on your scrapes to form a protective layer from bacteria.
20. Acne – Got a zit? Dab some on and let nature do its thang.
21. Sore Throat – Dissolve in mouth and let coat throat.
22. Gum removal – Coconut oil can help you get gum out of carpet, upholstery, hair, etc
23. Bruise – Rub some into a bruise. Will heal faster.
24. Deodorant – Mix with some baking soda for a natural deodorant. Nature is a powerful thing.
25. Make coconut milk ice cream – 1 Can coconut milk, 1/4 cup desired sweetener (I use organic coconut sugar or organic maple syrup), Optional: berries, fruit, bananas, whatever. Process: Blend everything together until smooth. Put in ice cream maker and run for 12-18 minutes. If you don’t have an ice cream maker, freeze in a bowl for 10-15 minutes then eat before it gets too hard.


 The first part of the coffee brewing ratio is the amount of coffee you are using—best measured in grams.


